REGULATIONS
DIN Standards, established by the Deutsche Institut für Normung e.V., regulate our products, services and processes according to internationally agreed standards.
Precision Mechanics and DIN Standards
DIN, which stands for Deutsches Institut Fur Normung e.. V., is the German institute founded in 1917 that deals with the standardisation of products, services and processes in Germany and worldwide. Since 1951 it has been a member of the International Organization for Standardization (ISO) and since 1975 it has been recognised as the body for German national standards which it also represents in the international organisation CEN (European Committee for Standardization).
As a partner for industry, research and society, it plays an important role in defining the so-called DIN standards, which certify quality in various fields, such as mechanical engineering.
The standards are developed with the full consensus of all parties involved, i.e. they are defined by a team of experts with the aim of arriving at a common, shared point of view. To date, there are more than 12,000 DIN standards, which are revised every five years by the board to take into account the latest trends in innovation.
Bonanomi and Compliance with DIN standards
Find out below the DIN standards relating to the squareness of machined surfaces and the machining of T-slots.
They are complied with during Mechanical Machining for Third Parties and the manufacturing phase of our precision engineering products, which are also available for immediate delivery!
DIN 875 Standard
The DIN 875 Standard refers to the squareness of machined surfaces. This standard applies to all workpieces that require precision in one or more 90° angles.
The DIN Standard for squareness or perpendicularity between two surfaces regulates the maximum deviation of adjacent surfaces from a fixed value of 90°, depending on the degree of precision required.
This deviation is calculated using the following formulae:

DIN 876 Standard
Among the various DIN Standards, the DIN 876 Standard refers to machined surfaces as Clamping Plates, Dressing Plates and Surface Plates. This standard guarantees limits within which the flatness of machined parts must refer.
Flatness can be defined as the divergence between the highest and the lowest point detected on the surface in relation to the maximum length of the part examined.
The degree of precision varies according to the maximum size of the part and the type of finish used.
There are various formulae for deriving the maximum permissible flatness error including:

DIN 650 Standard
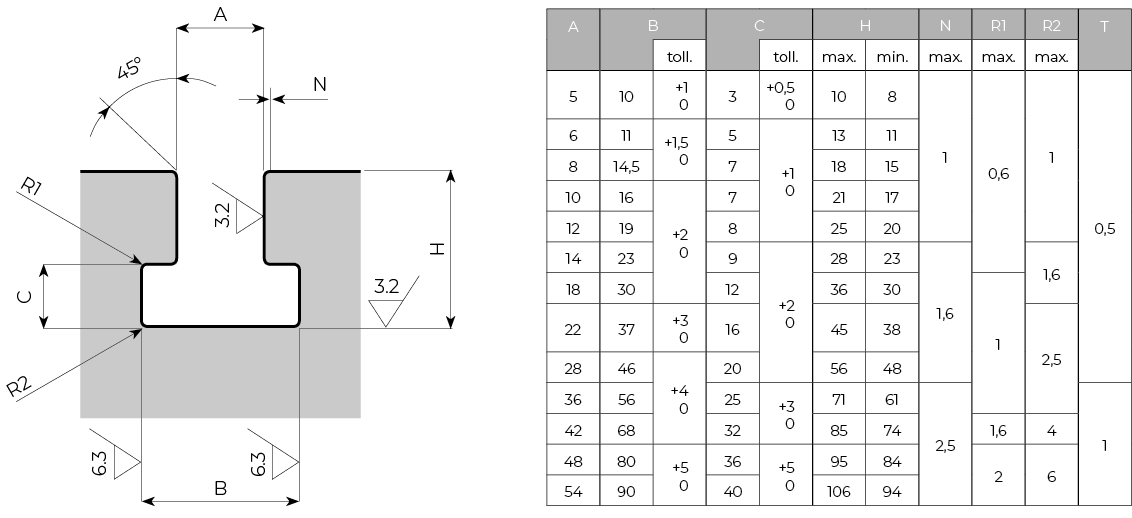
The DIN 650 Standard is used for the machining of T-slots and guarantees globally recognised performance standards.
These grooves must have homogeneous characteristics in order to be able to use accessories such as anchor bolts or other elements already on the market. The last variation in this regard dates back to March 1977 where some table slots such as 16 / 20 / 24 / 32 have been eliminated.
Bonanomi offers the whole range of slots as shown in the table below:

